Plasmo 内容脚本 UI 注入实战指南
最近在研究 Plasmo 框架时发现,with-content-scripts-ui 这个示例项目特别实用,它完整展示了如何在网页中通过内容脚本注入 React UI 组件。今天就来详细聊聊这个项目的实现原理和使用技巧。
项目概览
with-content-scripts-ui 是一个专门演示内容脚本 UI 注入的 Plasmo 扩展示例。这个项目配置了必要的权限,可以在任何 HTTPS 网站上注入 UI 组件,特别适合学习各种注入模式。
四种核心注入模式
1. Overlay 覆盖层模式
这种模式适合创建固定位置的浮动组件,比如通知、工具栏等:
// contents/plasmo-overlay.tsx
export const config: PlasmoCSConfig = {
  matches: ["https://www.plasmo.com/*"],
  css: ["font.css"]
}

export const getStyle = () => {
  const style = document.createElement("style")
  style.textContent = cssText
  return style
}
关键点:
- 使用
getStyle函数注入自定义样式 - 通过 CSS 文件实现样式复用
- 固定定位,不依赖页面元素
2. Inline 内联模式
当需要将组件嵌入到页面特定位置时,内联模式就很实用:
// contents/plasmo-inline.tsx
export const getInlineAnchor: PlasmoGetInlineAnchor = () =>
  document.querySelector(`[href="/#pricing"]`)

export const getShadowHostId = () => "plasmo-inline-example-unique-id"
使用场景:
- 在按钮旁边添加操作提示
- 在链接附近插入额外信息
- 需要与页面元素紧密配合的组件
3. Root Container 根容器模式
对于需要等待目标元素出现的复杂场景,根容器模式提供了更好的控制:
// contents/plasmo-root-container.tsx
export const getRootContainer = () =>
  new Promise((resolve) => {
    const checkInterval = setInterval(() => {
      const rootContainerParent = document.querySelector(`[href="/docs"]`)
      if (rootContainerParent) {
        clearInterval(checkInterval)
        const rootContainer = document.createElement("div")
        rootContainerParent.appendChild(rootContainer)
        resolve(rootContainer)
      }
    }, 137)
  })
优势:
- 支持异步等待目标元素
- 可以自定义容器创建逻辑
- 适合动态加载的页面
4. Anchored Overlay 锚点覆盖层模式
这种模式结合了覆盖层的灵活性和内联的精确定位:
// contents/plasmo-overlay-anchor.tsx
export const getOverlayAnchor: PlasmoGetOverlayAnchor = async () =>
  document.querySelector(`h1`)

export const watchOverlayAnchor: PlasmoWatchOverlayAnchor = (updatePosition) => {
  const interval = setInterval(() => {
    updatePosition()
  }, 420)
  return () => clearInterval(interval)
}
特色功能:
- 支持动态位置监听
- 组件会跟随锚点元素移动
- 适合需要实时更新的浮动组件
技术实现深度解析
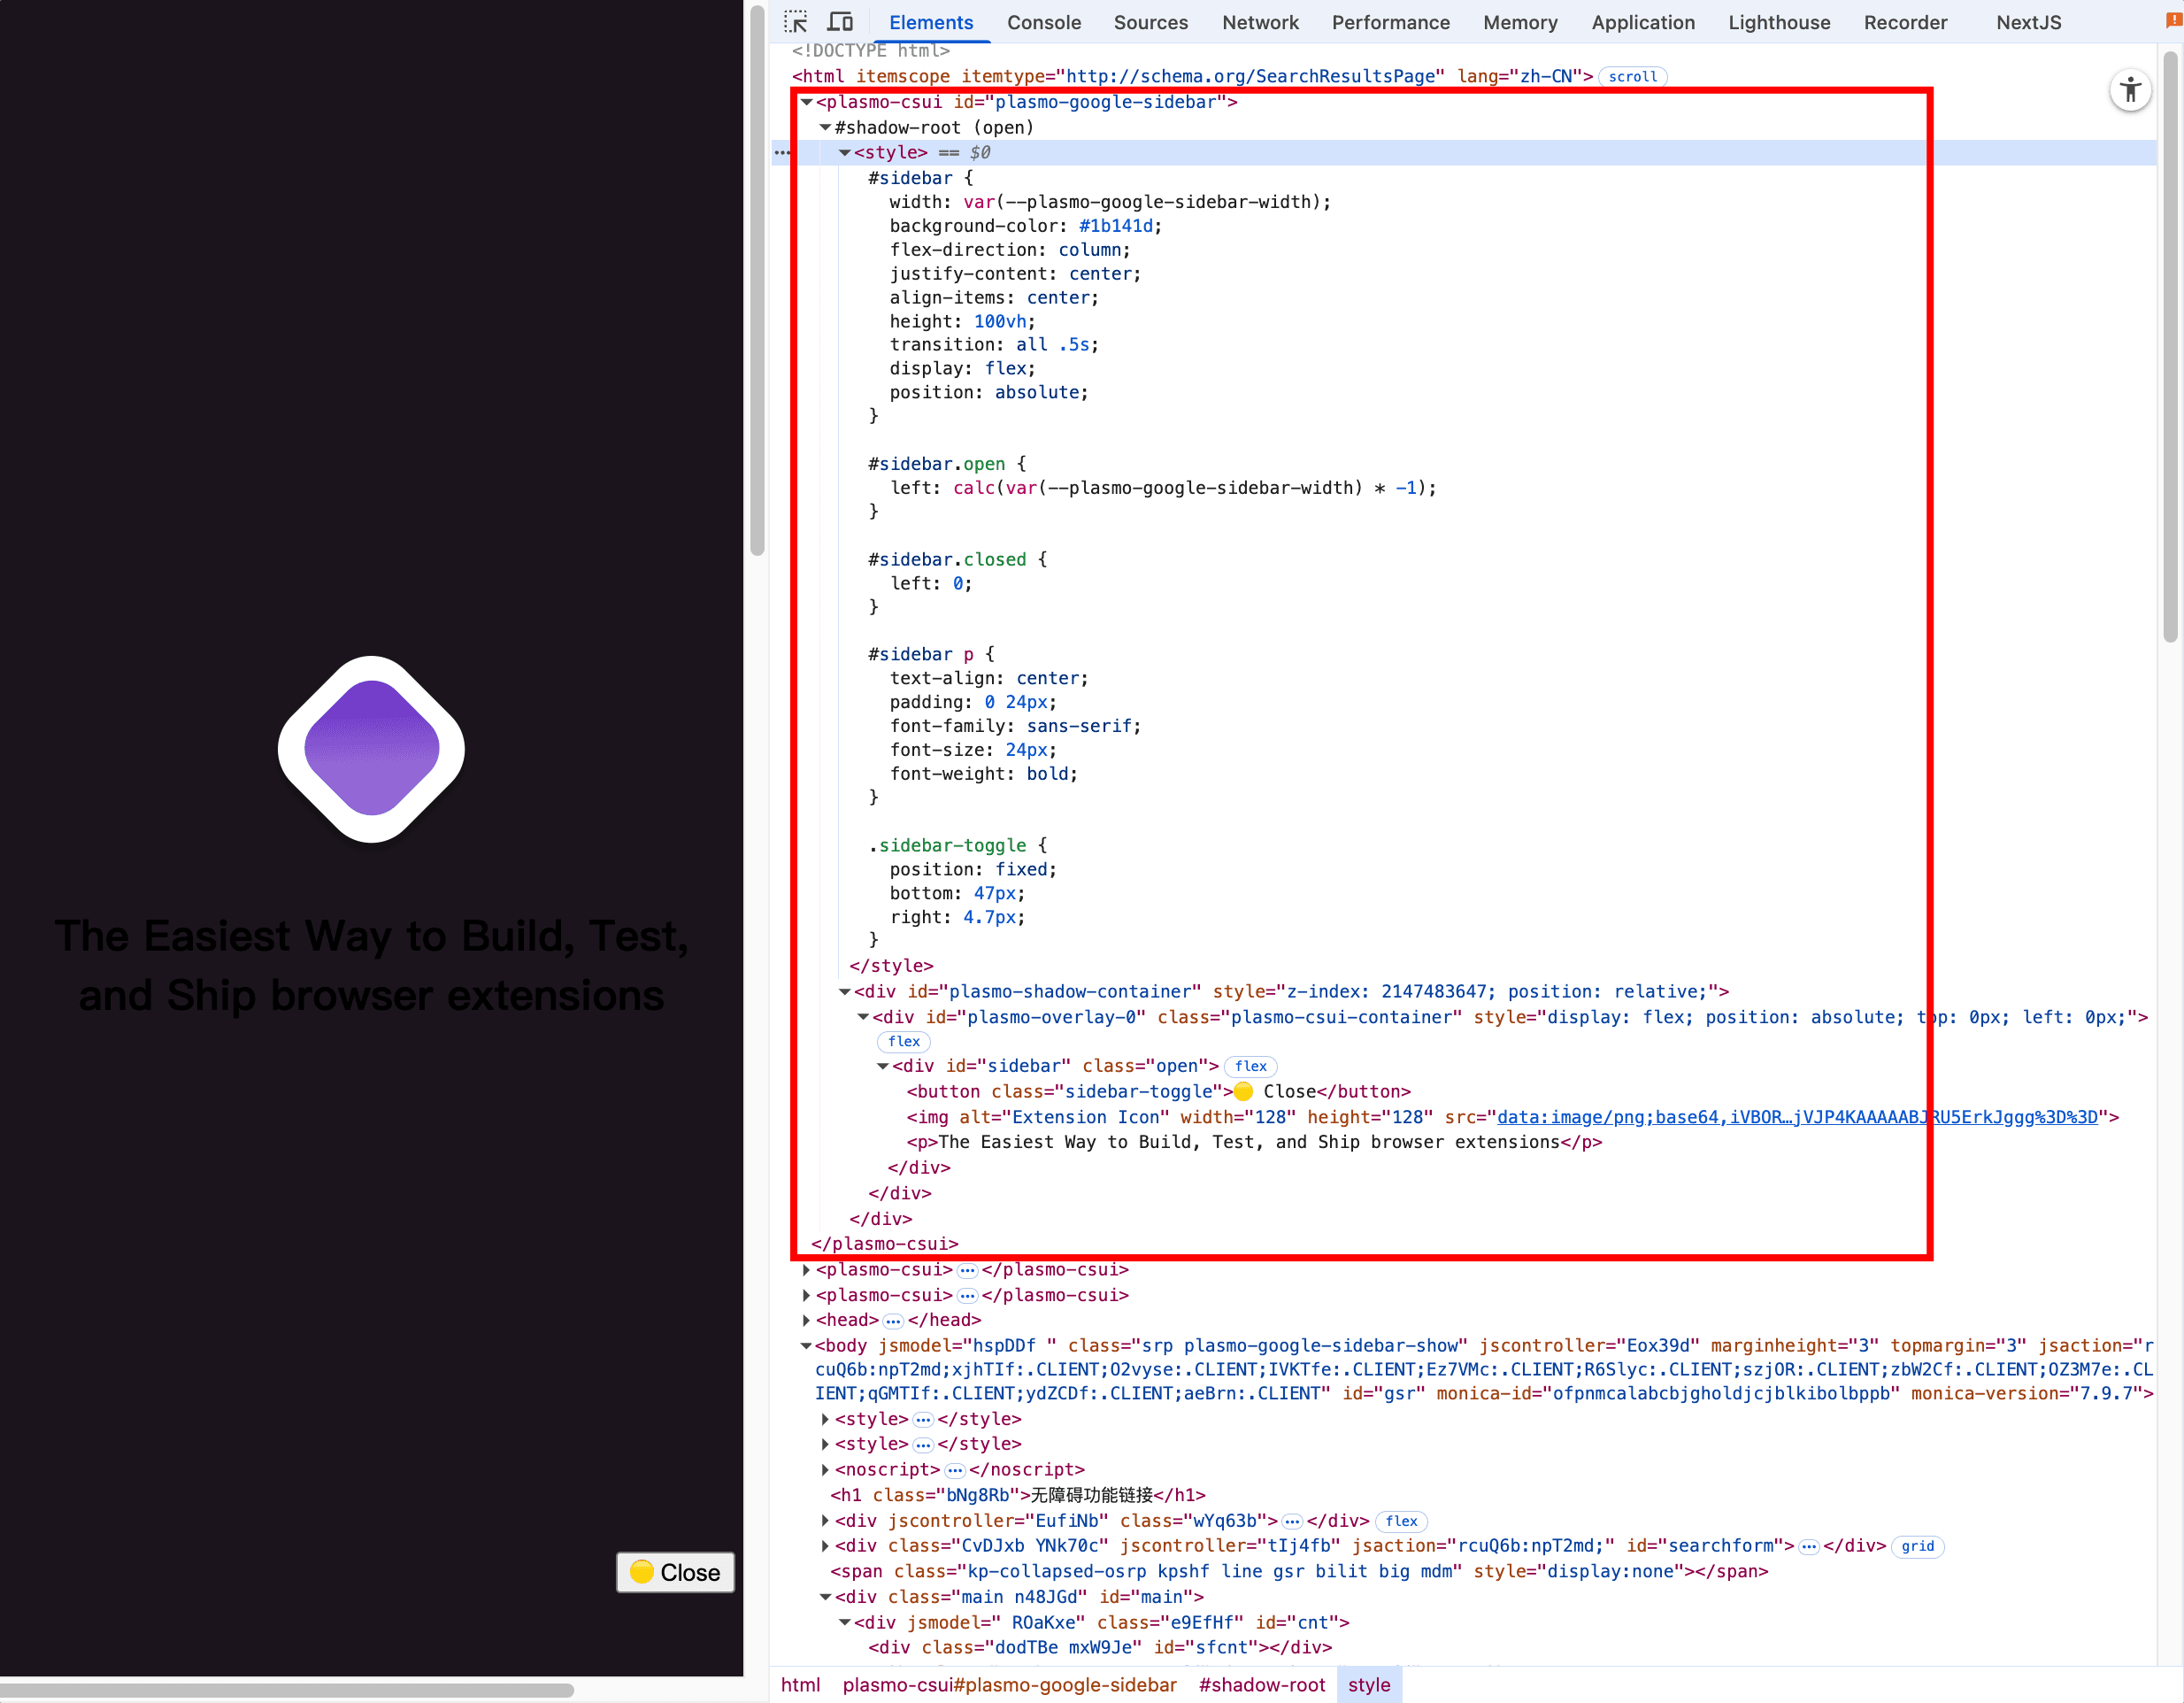
Shadow DOM 样式隔离
Plasmo 通过 Shadow DOM 实现样式隔离,这是避免与页面样式冲突的关键:
// 自动创建的 Shadow Host
const shadowHost = document.createElement("plasmo-csui")
shadowHost.id = getShadowHostId()
document.body.appendChild(shadowHost)

// 创建 Shadow Root
const shadowRoot = shadowHost.attachShadow({ mode: "open" })
组件挂载流程
整个注入过程可以概括为以下几个步骤:
- 权限检查:验证当前页面是否匹配配置的 URL 规则
- 容器创建:根据模式创建相应的 DOM 容器
- 样式注入:将组件样式插入到 Shadow DOM
- React 渲染:使用
createRoot挂载 React 组件 - 事件绑定:设置必要的交互和生命周期管理
配置独立性
每个内容脚本都有独立的配置,互不干扰:
// 每个文件都可以有自己的配置
export const config: PlasmoCSConfig = {
  matches: ["https://www.plasmo.com/*"],
  run_at: "document_idle"
}
实战应用场景
场景一:页面增强工具
比如为电商网站添加比价功能:
// 在产品页面注入比价组件
export const getInlineAnchor = () =>
  document.querySelector(".product-price")
场景二:开发辅助工具
为开发中的网站添加调试面板:
// 只在开发环境显示调试工具
export const config: PlasmoCSConfig = {
  matches: ["http://localhost:*/*", "http://127.0.0.1:*/*"]
}
场景三:内容批注系统
为文档网站添加评论和批注功能:
// 在文章段落旁边添加批注按钮
export const getOverlayAnchor = () =>
  document.querySelector("article p")
最佳实践建议
1. 选择合适的注入模式
- 简单通知 → Overlay 模式
- 页面集成 → Inline 模式
- 动态内容 → Root Container 模式
- 跟随元素 → Anchored Overlay 模式
2. 性能优化技巧
// 使用防抖避免频繁更新
const debouncedUpdate = useDebounce(updatePosition, 100)

// 懒加载重型组件
const HeavyComponent = React.lazy(() => import('./HeavyComponent'))
3. 错误处理策略
export const getRootContainer = () =>
  new Promise((resolve, reject) => {
    const timeout = setTimeout(() => {
      reject(new Error("目标元素加载超时"))
    }, 5000)

    // ... 正常的容器创建逻辑
  })
常见问题解答
Q: 样式冲突怎么解决?
A: Plasmo 的 Shadow DOM 已经提供了很好的样式隔离。如果还有冲突,可以使用 CSS Modules 或更具体的选择器。
Q: 组件如何与页面通信?
A: 可以通过 window.postMessage、Custom Events 或 Plasmo 的 Messaging API 实现安全通信。
Q: 性能影响大吗?
A: 合理使用的话影响很小。建议避免在大量页面上运行复杂组件,可以使用条件匹配减少不必要的注入。
Q: 支持 Vue 或其它框架吗?
A: Plasmo 主要针对 React 优化,但理论上可以通过自定义渲染支持其它框架。
总结
with-content-scripts-ui 示例项目真的很有学习价值,它展示了 Plasmo 在 UI 注入方面的强大能力。四种注入模式各有特色,可以根据具体需求灵活选择。
在实际开发中,我发现这种模块化设计让代码维护变得简单很多。每个功能都可以独立开发和测试,大大提高了开发效率。
如果你也在用 Plasmo 开发浏览器扩展,强烈建议仔细研究这个示例项目。有什么问题或心得欢迎一起交流!
相关资源